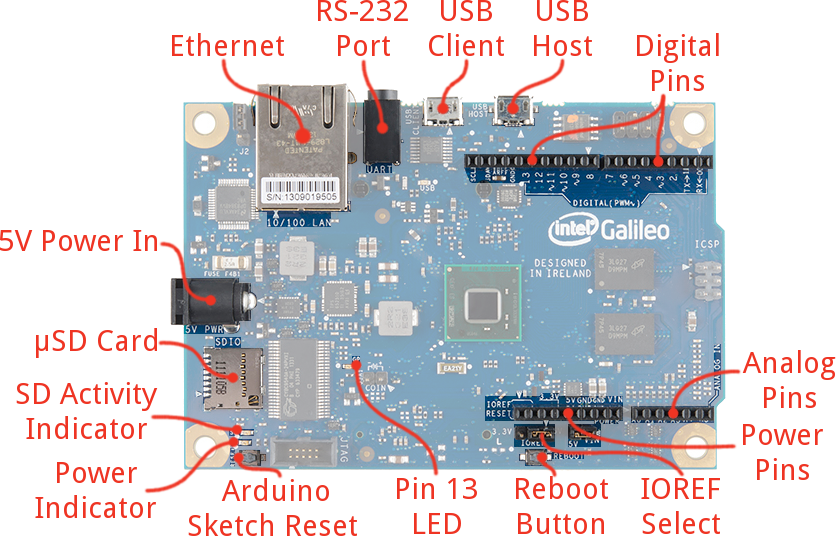
Pre-experiment notes: * With a SD card inserted on Galileo and a chosen network type (UART or LAN) connected, the system should be energized. For Wi-fi access, a Wi-Fi module must be connected in the mPCI-e slot.
* In this experience, we will make the communications using the Telnet protocol, because of his convenience. Using Telnet, only two connections are needed: one via USB to a computer (to upload the code to open Telnet communications on Galileo) and one via Ethernet to have access to the Telnet server. Albeit, the following steps are similar even in other types of network.
* You can use your favorit client to access the Galileo’s Linux via Telnet. If you're using a Windows PC, PuTTY it's one of the most popular clients available and it's very user-friendly. If you’re using a Linux PC, you can do it directly over the terminal. We will use the last method to this experience.
You have to upload the code below to Galileo, using the Arduino IDE:
1. |
void setup() { |

Once inside the embbedded Galileo's Linux, you have to configure the date/time of the system, and if you want to, download a text editor more user-friendly than the native Vi.
* To adjust date/time, use the command:
# date −s “17 JAN 2015 20:14”
To confirm, use:
# date
* To install Nano, the easiest way is putting the software .tgz (http://www.nano-editor.org/dist/v2.2/nano-2.2.0.tar.gz) on the mini SD card inserted on Galileo and execute the following:
# tar −xvf nano-2.2.0.tar.gz
# cd /nano
# ./configure
# make install
# install
Note: if the user wants to code in Python Language, it’s time to download the Python GPIO library (https://communities.intel.com/message/225802)and copy to the Libraries folder in Galileo.
Compiling a code: Like in a conventional Linux terminal, you have to use:
* C/C++:
# gcc teste.c −o teste
# ./teste.c
* Python:
python teste.py
* Embedded: Java
#java Teste
Manipulating GPIO's: GPIO's manipulation via Galileo Terminal is a very simple process, once you have the GPIO Mapping codes. In the following sections we show Galileo's GPIO Mapping table and some manipulation exercises.
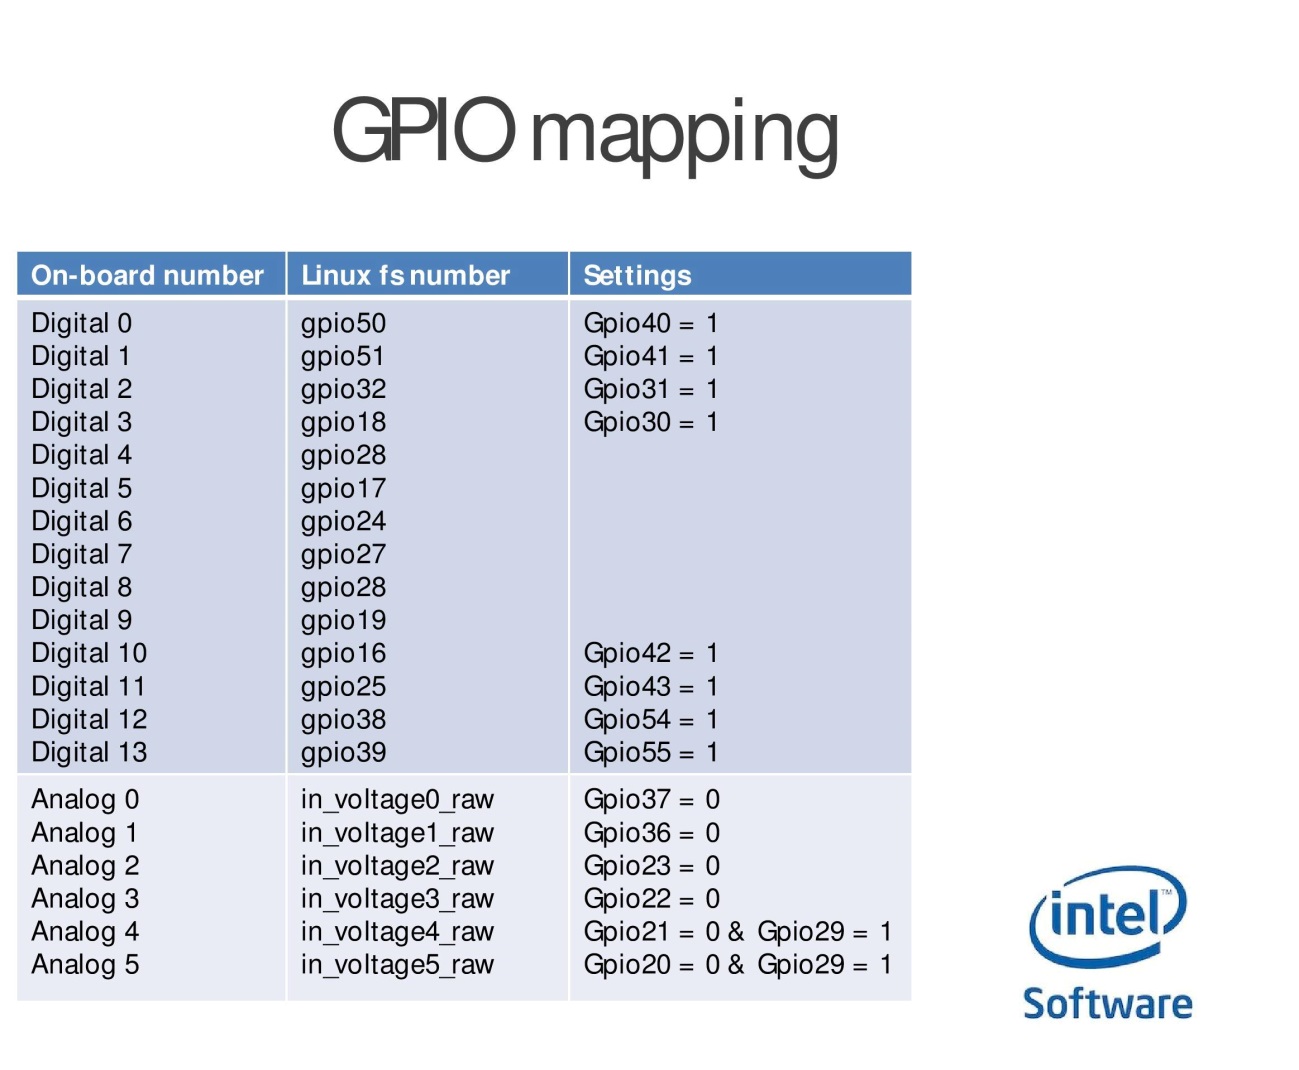
* Controlling Digital 13:
# gcc teste.c −o teste
# echo −n “39” > /sys/class/gpio/unexport /* Flushing values*/
# echo −n “39” > /sys/class/gpio/export /* Starting the gpio39 */
# echo −n “out” > /sys/class/gpio/gpio39/direction /* Here we set Digital 13 as an OUTPUT */
# echo −n “strong” > /sys/class/gpio/gpio39/drive
# echo −n “1” > /sys/class/gpio/gpio39/value /* Boolean logic: 1 for HIGH and 0 for LOW*/
# cat /sys/class/gpio/gpio39/value /* Reading the raw value on gpio39 */
* Reading raw voltage in the Analog 0:
#cat /sys/bus/iio/devices\:device0/in_voltage0_raw
* GPIO's Access via code lines:
To call these features in a conventional code, you just have to use them in the same method explained above, just calling it where you needed.