Turning a buzzer on by pressing a push-button.
Introduction: The buzzer is a electronic device that makes a sound (a buzz) when the crystals in his interior are excited by electic current.
Components needed:
→ One push-button;
→ A Buzzer

→ One 1k Ohm resistor;
→ Protoboard;
→ Jumpers.
1st Step:
On a Protoboard, assemble the circuit below:
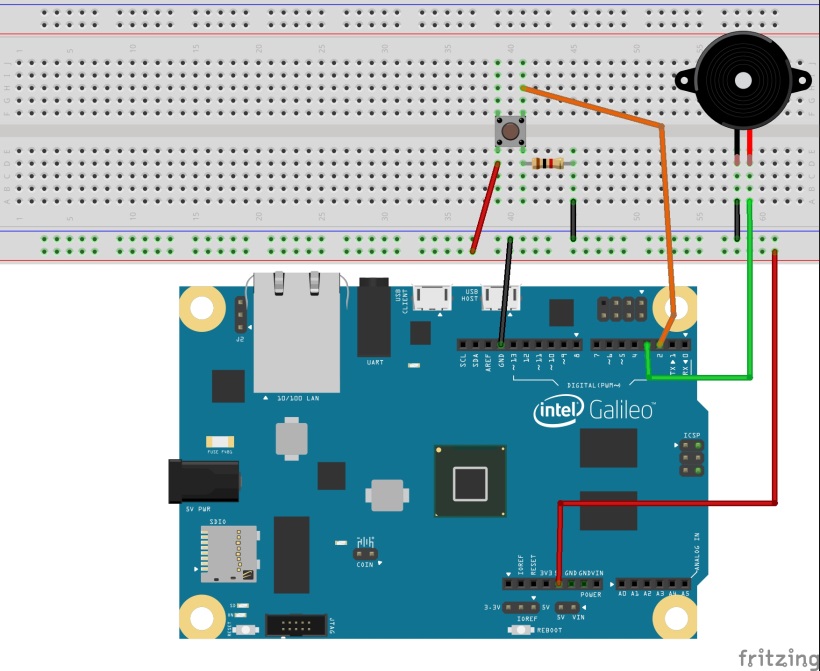
Where:
→ Red wires and black wires referes to VCC 5V and GND, respectively;
→ The Orange wire represents the signal received by Galileo when the push-button is pressed;
→ The green wire connects the buzzer to Galileo’s Digital 3.
Schematic

2nd Step:
Upload the following code to Galileo, using the Arduino IDE or compiling directly from Linux terminal:
		1.

		2.

		3.

		4.

		5.

		6.

		7.

		8.

		9.

        10.

        11.

        12.

        13.

        14.

        15.

        16.

        17.

        18.

        19.

        20.

        21.

        22.

        23.

        24.

        25.

        26.
|
            const int pinBuz = 3; //Buzzer Pin

	          const int pinSwi = 2; // Push-button pin


	            void setup() {

                  Serial.begin(9600); // Opens Serial communication

                  pinMode(pinBuz,OUTPUT); //Defines pinBuz as an Output

                  pinMode(pinSwi,INPUT); // Defines pinSwi as an input


                   }

	            void  loop () {

	              int botao; // To save the last logic state of the button

                botao = digitalRead(pinSwi); //Put the reading value of the switch on botao

	              Serial.println(botao); //Shows the logic state of the input on Serial Monitor

                  if (botao == 1)  // Pressed button, logic State HIGH (5V)

                   {

                 digitalWrite(pinBuz,1); //Switch pressed, buzzer on

                   }else

                   {

                    digitalWrite(pinBuz,0); //If the switch isn’t pressed, buzzer off.

                  }

                delay(10); //reading delay

                                                  }
|