The first thing to do is to download the base SoC implementation: SoC base files. The development environment of our SoC study case is divided in three directories: fpga contains the hardware description, firmware contains the software implementations, and bootloader contains the software for uploading the firmware to the FPGA.
The following structure is implemented:
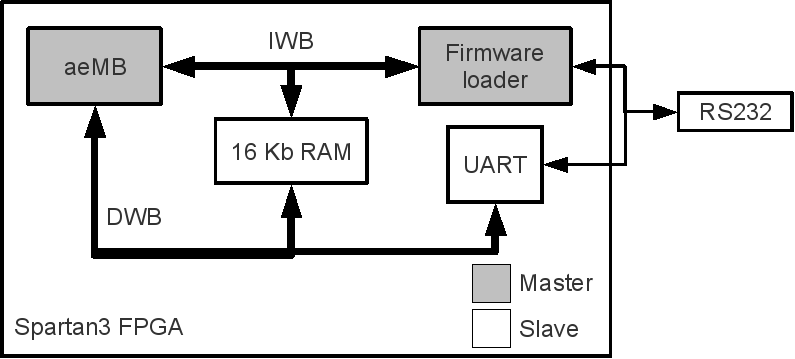
The system has an aeMB softcore, a 16 KB internal RAM memory, an UART device, and a bootloader implemented in hardware. The IP are connected using two wishbone buses: IWB and DWB . During boot time, the all of the components are kept in the reset state, except for the bootloader and the 16 KB memory. After the bootloader finishes uploading the firmware to the memory, it halts and the reset signal for the remaining devices are deasserted. The aeMB starts fetching instructions from the memory using the IWB, while the DWB is used for reading/writing data to the memory and other devices.
The file structure is described bellow:
The process to generate the hardware is very similar to the one of the previous exercise. Jump to the fpga/toplevel/wb_soc/ directory and run make bin mcs program to synthesize the hardware and burn it to the FPGA. If make program does not work (and it may not) use impact (go back to the counter exercise for details).
Jump to the fpga/testbench/ directory and run make wb_soc to simulate the hardware. You will notice that the simulation takes a (very) long time to finish. For complex designs, simulating the full system is not reasonable, so each new IP must be individually validated before being added to the rest of the system.
The aeMB implements the Microblaze ISA, so you will need a Microblaze compiler to compile the firmware. Xilinx provide a GCC port for the Microblaze architecture which is part of the ISE design suite. So if you are able to synthesize the HW, the Microblaze compiler is also installed.
To compile the firmware, go to firmware/ and run make all. The led_keyboard.c will be compiled. At the moment, this file just tests the simple wishbone device (fpga/cores/example/*: and then implements a UART loopback.
To upload you must connect the Spartan3 board RS232 to the serial port of a PC (or to the USB using a SERIAL-to-USB adapter). Modify the makefile so the UART variable will to the correct device and the run make prog. After sending the firmware the bootloader UART will switch to user mode (i.e. it will print data receied from the UART and send characters typed in the terminal).
NOTE1: To upload a new firmware you must reset the board before running the bootloader.
NOTE2: The pre-compiled bootloader should work, if that's not the case, jump to bootloader/ and run make clean all.
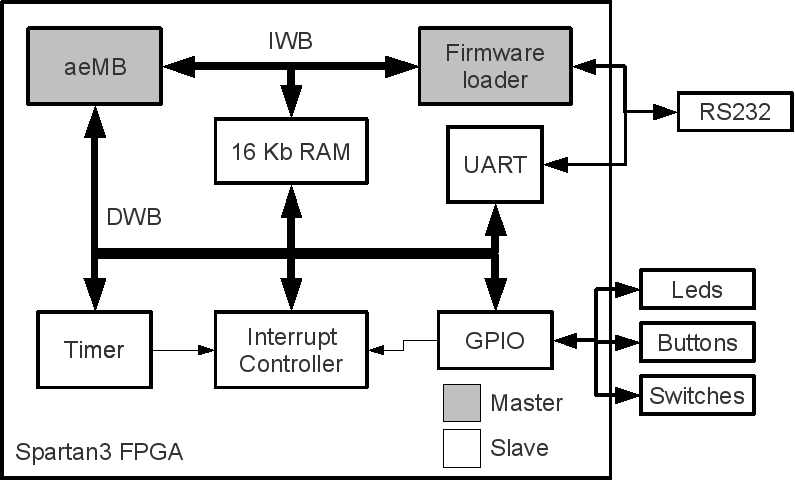
The exercise consists in reimplementing the light keyboard using your own SoC. The first step it to add to the base SoC the necessary IPs to support the implementation of the light keyboard: GPIO and Timer. Since the aeMB have only one interrupt pin, you must find a way for it to support multiple interrupts. You may need to implement a interrupt controller. The final HW may have the following structure:
NOTE: The base SoC is implemented in Verilog, but you can implement your IPs in either Verilog or VHDL.
The first part is to implement the round-robin light keyboard. You only need to modify the HW by adding a GPIO IP to the SoC. You have to accomplish this considering the following requirement:
For part 2 you must implement the time triggered light keyboard. You will need to implement a timer IP following this restrictions:
Afterwards you must add interrupt support for your GPIO IP. The only restriction is that the software must be able to configure which IO port will trigger an interrupt.
The final step is to add support for multiple interrupts. You may chose one of the following approaches to accomplish this: